Conch Piercing: Your Ultimate Guide to Placement, Aftercare, and Healing
The conch piercing, a captivating adornment situated on the outer or inner rim of the ear, has surged in popularity, becoming a staple in modern body art. This comprehensive guide delves into every aspect of conch piercings, from selecting the perfect placement to navigating the healing process and choosing the right jewelry. Whether you’re a piercing veteran or a first-timer, this guide will equip you with the knowledge to make informed decisions and ensure a smooth and successful piercing experience.
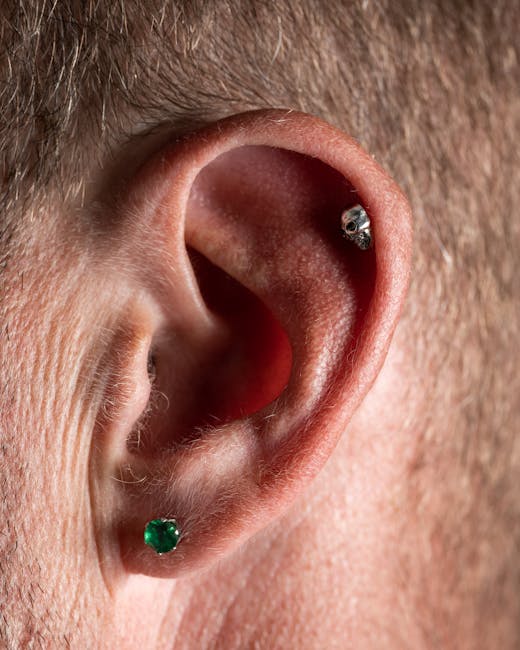
Understanding Conch Piercing Anatomy and Placement
Before diving into the specifics of aftercare and jewelry, let’s understand the anatomy of the conch. The ear’s conch comprises two distinct areas: the inner conch and the outer conch.
Inner Conch Piercing
The inner conch piercing is located in the deeper concavity of the ear, offering a more subtle yet striking look. This placement often necessitates a slightly longer healing period due to its location and potential for increased irritation.
Outer Conch Piercing
The outer conch piercing is situated on the prominent, outer ridge of the ear. It’s generally considered easier to heal and less prone to irritation compared to its inner counterpart. This makes it a popular choice for first-time conch piercers.
Choosing the Right Placement
The optimal placement depends on your personal preference, ear anatomy, and the piercer’s expertise. A skilled piercer will assess your ear structure, suggesting the best placement that minimizes risk and maximizes aesthetic appeal. They’ll take into account the thickness of your cartilage and the overall balance of your ear piercings.
The Conch Piercing Healing Process
The healing process for a conch piercing typically takes anywhere from 6 to 12 months, sometimes even longer. This is significantly longer than lobe piercings due to the thicker cartilage involved. Patience and diligent aftercare are crucial for a successful healing journey.
Stages of Healing
- Initial Stage (Weeks 1-4): Expect some swelling, tenderness, and minor bleeding. Keep the piercing clean and follow aftercare instructions meticulously.
- Intermediate Stage (Weeks 4-12): The swelling should subside, and the initial tenderness will decrease. However, the piercing might still be sensitive to touch.
- Final Stage (Months 12+): The piercing should be fully healed, though it may take longer depending on individual factors. You’ll notice minimal discomfort and increased firmness around the piercing site.
Conch Piercing Aftercare: A Step-by-Step Guide
Proper aftercare is paramount to prevent infection and complications. Follow these steps diligently:
- Hand Hygiene: Always wash your hands thoroughly with antibacterial soap before touching your piercing.
- Cleaning: Twice daily, gently cleanse the piercing with a saline solution (you can find this at most pharmacies) or a mild, fragrance-free soap. Avoid harsh chemicals or alcohol-based cleansers.
- Avoid Touching: Resist the urge to constantly touch or rotate the jewelry, as this can introduce bacteria and prolong the healing process.
- Sleep Position: Try to sleep on your back or on the opposite side of your pierced ear to minimize pressure and irritation.
- Hair Care: Keep your hair clean and away from the piercing to avoid accidental snags and infection.
- Jewelry: Refrain from changing your jewelry during the initial healing phase. Your piercer will advise when it’s safe to switch to a new piece.
- Signs of Infection: Be vigilant for signs of infection, including increased pain, swelling, redness, pus, or fever. Seek immediate medical attention if you suspect an infection.
Potential Complications and Risks
While conch piercings are generally safe, certain complications can arise if proper aftercare is neglected or if the piercing isn’t executed correctly. These include:
- Infection: A significant risk, especially if aftercare is lacking. Infection can manifest as redness, swelling, pain, and pus.
- Keloid Scarring: Excessive scar tissue formation that can appear as raised, bumpy scars.
- Hypertrophic Scarring: Similar to keloid scarring, but less severe and usually resolves on its own.
- Migration: The piercing may move slightly over time, especially if the jewelry is too heavy or improperly placed.
- Rejection: The body may reject the piercing, causing it to push itself out.
Choosing the Right Conch Piercing Jewelry
The initial jewelry for a conch piercing is usually a simple implant-grade titanium or bioplast stud. These materials are hypoallergenic and less likely to cause irritation during the healing process. Once healed, you have a wide range of jewelry options, including:
- Titanium: A strong, hypoallergenic metal that comes in various finishes.
- Bioplast: A flexible and biocompatible plastic ideal for sensitive ears.
- Surgical Steel: A common choice, but it may not be suitable for those with sensitive skin.
- Gold: A popular choice for its aesthetic appeal, but ensure it’s high-quality (14k or higher) to minimize allergic reactions.
Remember, always consult your piercer before changing your jewelry, especially during the healing phase. They can guide you on appropriate jewelry choices and ensure the safe removal and insertion of new pieces.
Finding a Reputable Piercer
Choosing the right piercer is crucial for a safe and successful conch piercing. Look for a piercer with the following qualities:

- Experience and Expertise: Choose a piercer with extensive experience and a solid reputation within the industry.
- Sterile Environment: Ensure the piercing studio maintains a clean and sterile environment to minimize the risk of infection.
- Proper Technique: A skilled piercer will use appropriate techniques and sterile equipment.
- Aftercare Instructions: A reputable piercer will provide thorough aftercare instructions and be available to answer any questions.
Investing time in finding a qualified piercer is essential for a positive piercing experience and minimizes the risk of complications.